3. Campaigns
3.1. Campaign
You can create and manage your campaigns running in CMS.
3.1.1. Create a new campaign
Press the “Create Campaign” button on the upper left corner of main campaign page, Figure 3.1 I, to create a new campaign.
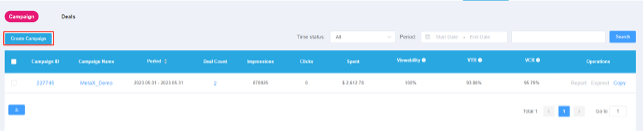
Figure 3.1 I Main Campaign Page
The very first thing required to set up any campaign is to provide some basic information in the create campaign page, Figure 3.1 II, such as Campaign Name, Total Impressions, Total Budget, Time zone and Start Date/End Date.
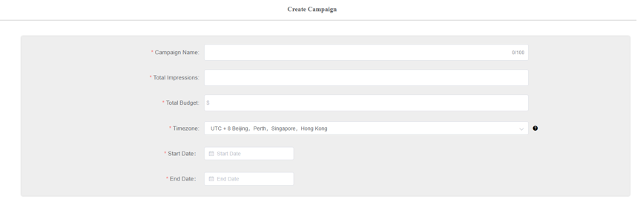
Figure 3.1 II Create Campaign Page
Next select the placement in the placement settings, Figure 3.1 III, which you want to delivery, and align the budget and impressions for the placement, click “Save” button to finish the campaign created process. E.g. Placement: Power on Video, Budget: $80, Impressions: 10000, system will automatically calculate eCPM.
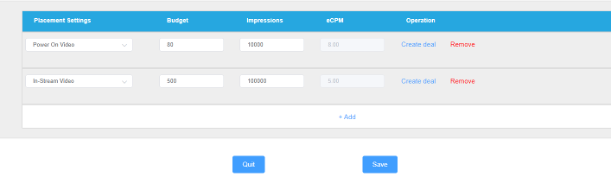
Figure 3.1 III Placement Setting
3.1.2. Modify Campaign
Click Campaign name or Campaign ID in the campaign main page, Figure 3.1 IV, to the campaign detailed page, Figure 3.1 V, and click the button on the upper right corner to enable editing. Note: If you haven’t created a deal yet, you can change all the information. But if you have created a deal of this campaign, you need modify both on campaigns and deals to ensure consistency between campaign and deals. The actual execution of the campaign will be based on the information of the deal.
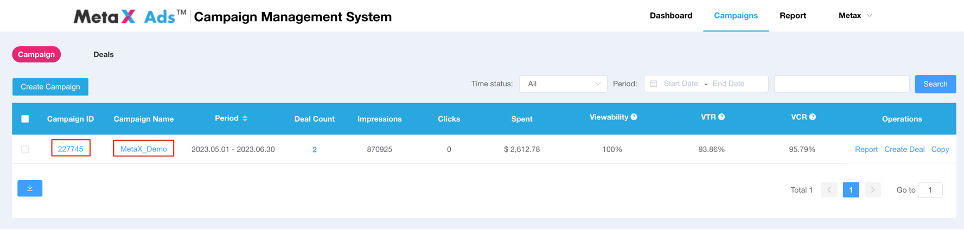
Figure 3.1 IV Main Campaign Page
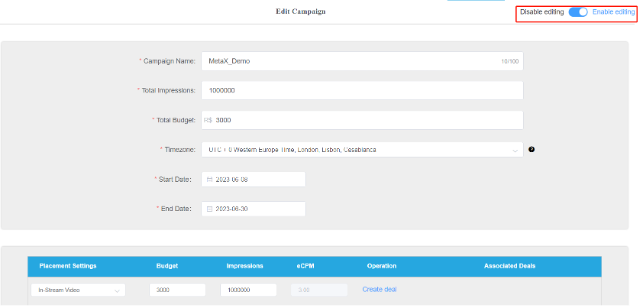
Figure 3.1 V Campaign Detailed Page
3.1.3. Copy Campaign
Existing campaigns can be duplicated by click the copy icon in the campaign main page, Figure 3.1 VI. You can choose to copy only the campaign without the deals, or copy both the campaign and the deals.
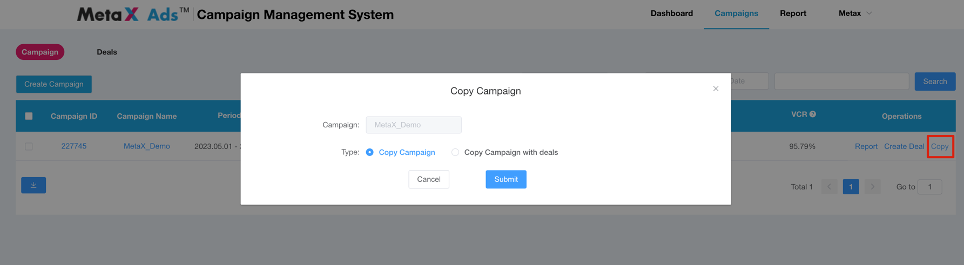
Figure 3.1 VI Main Campaign Page
3.2. Deals
It is required to associate each deal to a campaign. A campaign must have at least one deal to run. You can also have a group of deals running during the time period included in the campaign, with different or the same placement settings. 3.2.1. Create Deal —————————— Deals can be created in two ways: The main campaign page - On the main campaign page, Figure 3.2 I, click the “create deal” button on the Operations bar. The detailed campaign page – Click the campaign name to campaign detailed page, Figure 3.2 II, you will see “Create Deal” button on the placement-operation bar.

Figure 3.2 I Main Campaign Page

Figure 3.2 II Campaign Detailed Page
3.2.1.1. Basic Settings in Deal
Placement – Select the placement which you select in the Campaign Deal name Start/End Date – the start and end date of the deal Advertiser Domain – Some Client will block no Advertiser Domain demands, you’d better to fill in the advertiser Domain to avoid missing. Auto Start – default Yes, if you select yes, when all the conditions are met, the deal will automatically start. Pacing – Evenly or ASAP, default ASAP, in ASAP Pacing, we aim to complete the budget immediately. With Even Pacing, we aim to complete the budget for a normal 24-hour day. Frequency Cap – No limitation or By device, default No limitation, if you select By device, you need set the number of impressions per day for per device. Total impressions – Total impressions of this deal, it also means the total budget of the deal. Daily Impressions – Daily Impressions you want to delivery in a day, it also means the daily budget of the deal. Unit Price: Auto fill with the ecpm in Campaign
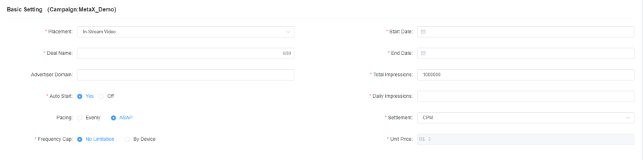
Figure 3.2 III Deal Basic Settings
3.2.1.2. Targeting in Deal
Add Targeting to your deal in the Targeting model. MetaX CMS currently supports targeting by: Hours Control – Hours Control allows you to select which time slots you want the ads to show. Device Type – CTV(Contented TV), IA(mobile device) Country – All/Include State – All/Include IP – All/ Include/Exclude Language – All/Include/Exclude Content Category – All/Include/Exclude
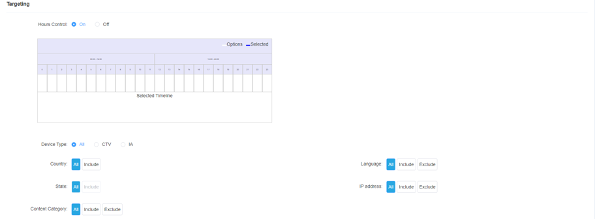
Figure 3.2 IV Deal Target
3.2.1.3. Creatives
Event Image Pixels – If you have Tracking Event Pixels that you want to track, add them in this section. Please note it is an URL not a HTML Tag. Click-to-Action URL – If you have click URL, add it in this section. Creative Category – Select the category of your creative Ads Duration – This section only need when you select static placement and upload image creatives. If your creative is video/vast URL format, this section needn’t fill in. Material - There are two options when uploading Creatives using the +Creatives. You can upload up to 4 materials in a deal. 1) Upload Files (Video Creatives, Image Creatives) 2) VAST URL
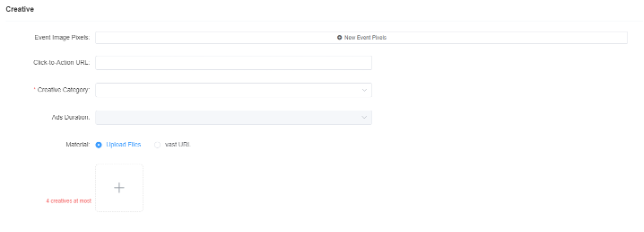
Figure 3.2 V Creatives
3.2.2. Modify Deal
Click Deal name from the Deal main page to the deal detailed page, Figure 3.2 VI, click the button on the upper right corner to enable editing. Note: 1) If you change the total impression and daily impressions in deal, please keep consistent with the settings in the campaign. 2) You cannot change the unit price in the deal, if you want to change, please change it in Campaign.
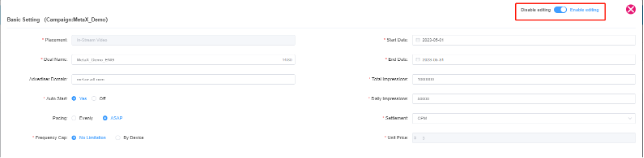
Figure 3.2 VI Deal Detailed Page
3.2.3. Copy Deal
Existing deals can be duplicated by click the copy icon in the deal page, Figure 3.2 VII.
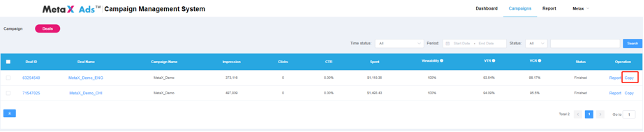
Figure 3.2 VII Main Deal Page